I had a recent request from a client whose current third-party salesperson commission software wasn’t working for them anymore – it just wasn’t able to do the things that they needed it to. And, their business was at a disadvantage because of it.
So, we did a needs analysis to identify a solution. During my discussion with the client, we outlined the following requirements:
- Provide a place to store up to five additional sales people per customer maintenance address card.
- At time of sales order integration, associate the current five additional sales people with the sales order.
- When sales order is transferred to invoice have the sales people associated with the sales order transferred to the invoice.
The client already owned eOne Solutions Extender software, so we proposed the following solutions:
- Create Extender window on Customer Address Maintenance window for the additional sales people.
- Create Extender window on Sales Transaction Entry window for the additional sales people.
- Create Extender solution view of Customer Address Maintenance and Sales Transaction Entry window data.
- Create SQL trigger on SOP10100, Sales Order Header table, to transfer sales order sales people to sales invoice.
- Create SQL trigger on SOP10100, Sales Order Header table, to handle sales order creation and copying current sales people from customer address maintenance record sales order.
In this post, let’s take a look at how these solutions were implemented.
Creating the Extender Windows
First, we need to create the Extender windows to store the additional sales people associated with each customer address.
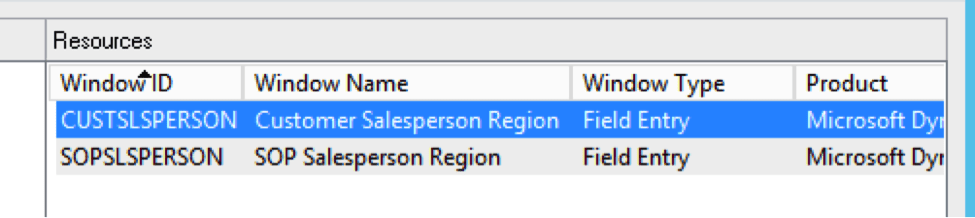
- Create two Extender windows named CUSTSLSPERSON and SOPSLSPERSON. I’ll go through the steps for SOPSLSPERSON below.
- Open Extender and create a solution and then a new Extender window.
- Name the window ID SOPSLSPERSON and give it and description.
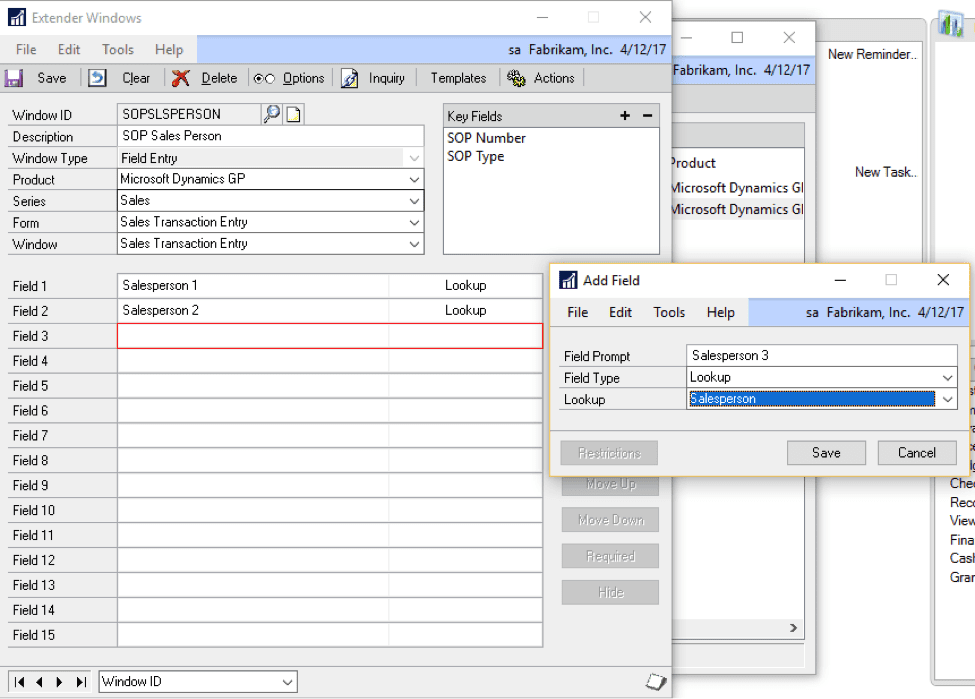
- From the Product drop down list choose “Microsoft Dynamics GP”
- For the Series drop down choose “Sales” and then “Sales Transaction Entry” from Form and Window.
- Add five fields and make them lookup fields associated with the salesperson table in GP.
Using the copy function on the Extender solution window, you can copy the SOPSLSPERSON window and name it CUSSLSPERSON, and then open it and change the Microsoft Dynamics GP window it’s associated with – and the key fields. The changes should look like the screen shot below when you’re done.

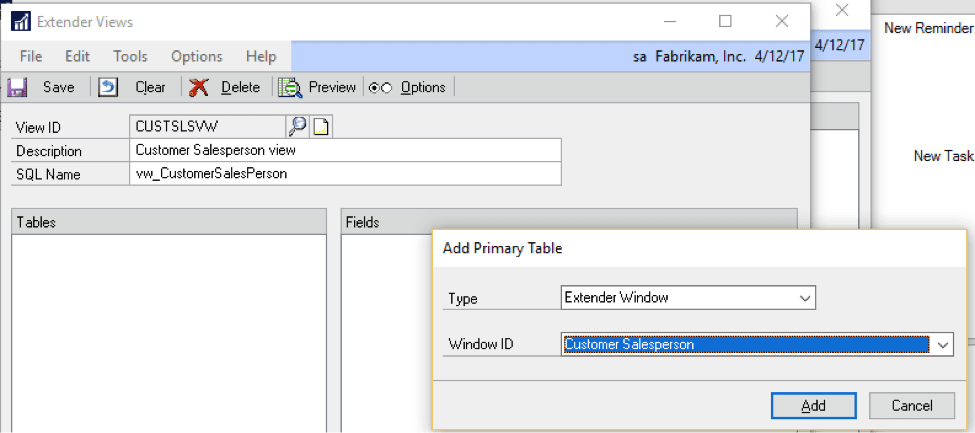
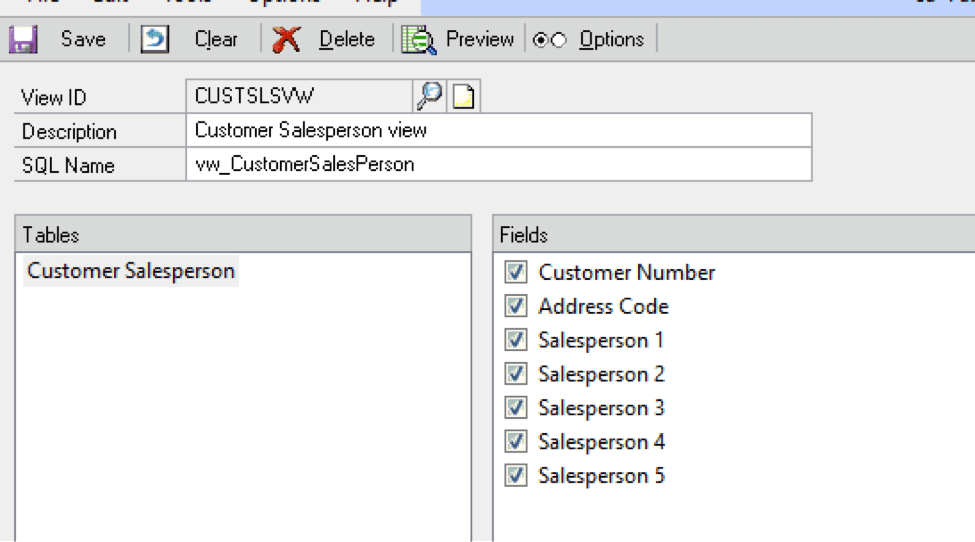
Create Extender SQL views
Now, create two Extender views associated with each of the Extender windows that we just created. I’m going to use “vw_CustomerSalesPerson” as the SQL name for the Customer Extender window and “vw_EXT_SOPSLSPERSON” as the SQL name for the Sales Transaction Entry Extender window. To create the view, select the Extender Windows as the Primary Table and then the Window ID. Select all of the fields and then Save the Extender view to publish to SQL server.
Creating SQL triggers to record the salesperson data
With all the Extender windows and views created, we need to create a way to handle the population of the Sales Transaction Entry Extender window when the Sales Order is first created, and then the copying of the Sales Order sales people from the order to the invoice. For this, I created two SQL triggers on the SOP10100 table.
SET ANSI_NULLS ON
GO
SET QUOTED_IDENTIFIER ON
GO
CREATE TRIGGER [dbo].[KTL_U_SOP10100_SLSPERSON] ON [dbo].[SOP10100]
AFTER UPDATE
as
DECLARE @insSOPNUMBE char(21)
DECLARE @SOPTYPE int
SELECT @insSOPNUMBE = SOPNUMBE
FROM Inserted
WHERE SOPTYPE=3
SELECT @SOPTYPE = SOPTYPE
FROM Inserted
WHERE SOPNUMBE = @insSOPNUMBE
IF (@SOPTYPE = 3)
BEGIN
DECLARE @ORIGTYPE2 int
DECLARE @ORIGNUMB2 char(21)
DECLARE @FieldValue1 char(15)
DECLARE @FieldValue2 char(15)
DECLARE @FieldValue3 char(15)
DECLARE @FieldValue4 char(15)
DECLARE @FieldValue5 char(15)
SET @ORIGNUMB2 = (SELECT ORIGNUMB from SOP10100 WHERE SOPNUMBE = @insSOPNUMBE)
SET @ORIGTYPE2 = (SELECT ORIGTYPE from SOP10100 WHERE SOPNUMBE = @insSOPNUMBE)
SET @FieldValue1 = (Select [Salesperson 1] from [dbo].[vw_EXT_SOPSLSPERSON] where rtrim([SOP Number]) = rtrim(@ORIGNUMB2) and rtrim([SOP Type]) = rtrim(convert(char(15),@ORIGTYPE2)))
SET @FieldValue2 = (Select [Salesperson 2] from [dbo].[vw_EXT_SOPSLSPERSON] where rtrim([SOP Number]) = rtrim(@ORIGNUMB2) and rtrim([SOP Type]) = rtrim(convert(char(15),@ORIGTYPE2)))
SET @FieldValue3 = (Select [Salesperson 3] from [dbo].[vw_EXT_SOPSLSPERSON] where rtrim([SOP Number]) = rtrim(@ORIGNUMB2) and rtrim([SOP Type]) = rtrim(convert(char(15),@ORIGTYPE2)))
SET @FieldValue4 = (Select [Salesperson 4] from [dbo].[vw_EXT_SOPSLSPERSON] where rtrim([SOP Number]) = rtrim(@ORIGNUMB2) and rtrim([SOP Type]) = rtrim(convert(char(15),@ORIGTYPE2)))
SET @FieldValue5 = (Select [Salesperson 5] from [dbo].[vw_EXT_SOPSLSPERSON] where rtrim([SOP Number]) = rtrim(@ORIGNUMB2) and rtrim([SOP Type]) = rtrim(convert(char(15),@ORIGTYPE2)))
EXEC [dbo].[taExtenderWindowAddUpdate]
@I_vWindowID = ‘SOPSLSPERSON’,
@I_vKey1 = @insSOPNUMBE,
@I_vKey2 = ‘3’,
@I_vFieldValue1 = @FieldValue1,
@I_vFieldValue2 = @FieldValue2,
@I_vFieldValue3 = @FieldValue3,
@I_vFieldValue4 = @FieldValue4,
@I_vFieldValue5 = @FieldValue5,
@O_iErrorState = 0,
@oErrString = 0
END
SET ANSI_NULLS ON
GO
SET QUOTED_IDENTIFIER ON
GO
CREATE TRIGGER [dbo].[KTL_U_SOP10100_SLSPCUS] ON [dbo].[SOP10100]
AFTER UPDATE
as
DECLARE @insSOPNUMBE char(21)
DECLARE @SOPTYPE int
SELECT @insSOPNUMBE = SOPNUMBE–ORIGNUMB
FROM Inserted
WHERE SOPTYPE=2
SELECT @SOPTYPE = SOPTYPE–ORIGNUMB
FROM Inserted
WHERE SOPNUMBE = @insSOPNUMBE
IF (@SOPTYPE = 2)
BEGIN
DECLARE @PRSTADCD char(15)
DECLARE @CUSTNMBR char(15)
DECLARE @FieldValue1 char(15)
DECLARE @FieldValue2 char(15)
DECLARE @FieldValue3 char(15)
DECLARE @FieldValue4 char(15)
DECLARE @FieldValue5 char(15)
SET @ORIGNUMB2 = (SELECT ORIGNUMB from SOP10100 WHERE SOPNUMBE = @insSOPNUMBE)
SET @ORIGTYPE2 = (SELECT ORIGTYPE from SOP10100 WHERE SOPNUMBE = @insSOPNUMBE)
SET @PRSTADCD = (SELECT PRSTADCD from SOP10100 WHERE SOPNUMBE = @insSOPNUMBE)
SET @CUSTNMBR = (SELECT CUSTNMBR from SOP10100 WHERE SOPNUMBE = @insSOPNUMBE)
SET @FieldValue1 = (Select [Physical] from dbo.vw_CustomerSalesperson where rtrim([Customer Number]) = rtrim(@CUSTNMBR) and rtrim([Address Code]) = rtrim(@PRSTADCD))
SET @FieldValue2 = (Select [HPV] from dbo.vw_CustomerSalesperson where rtrim([Customer Number]) = rtrim(@CUSTNMBR) and rtrim([Address Code]) = rtrim(@PRSTADCD))
SET @FieldValue3 = (Select [Balances] from dbo.vw_CustomerSalesperson where rtrim([Customer Number]) = rtrim(@CUSTNMBR) and rtrim([Address Code]) = rtrim(@PRSTADCD))
SET @FieldValue4 = (Select [LCMS Biotech] from dbo.vw_CustomerSalesperson where rtrim([Customer Number]) = rtrim(@CUSTNMBR) and rtrim([Address Code]) = rtrim(@PRSTADCD))
SET @FieldValue5 = (Select [FNIRS] from dbo.vw_CustomerSalesperson where rtrim([Customer Number]) = rtrim(@CUSTNMBR) and rtrim([Address Code]) = rtrim(@PRSTADCD))
EXEC [dbo].[taExtenderWindowAddUpdate]
@I_vWindowID = ‘SOPSLSPERSON’,
@I_vKey1 = @insSOPNUMBE,
@I_vKey2 = ‘2’,
@I_vFieldValue1 = @FieldValue1,
@I_vFieldValue2 = @FieldValue2,
@I_vFieldValue3 = @FieldValue3,
@I_vFieldValue4 = @FieldValue4,
@I_vFieldValue5 = @FieldValue5,
@O_iErrorState = 0,
@oErrString = 0
END
Conclusion
This post was a little different from my normal Power BI posts, but it’s just one of many ways you can use eOne Solutions’ Extender software to Enhance Dynamics GP functionality. Stay tuned for the future Power BI developments. And, please contact KTL Solutions to kick start your organization into becoming data-driven by exploring your Business Intelligence, BI360, Power BI, Microsoft Dynamics GP and CRM needs.