Creating Purchase Orders for your inventory and confirming that you’re ordering based on your expected inventory needs is a difficult task – but keeping your inventory aligned correctly is essential to your success.
Fortunately, the Purchase Order Generator feature in Microsoft Dynamics GP can analyze your inventory based on defined requirements, create automatic reorder points, and automatically create the Purchase Order to fulfill those inventory requirements. The end result is a streamlined inventory that aligns with your expected needs.
In Part I of this series, we covered the four main touch points to configure when using this feature: Item Resource Planning, PO Gen Item, Item Vendor Maintenance, and Item Quantities and default vendor. Configuration on these touch points is necessary to use the feature correctly; be sure to take a look at Part I before jumping in.
In this post (Part II), we’ll cover the actual PO Generation Process in Dynamics GP.
To Automate the PO Generation process in Dynamics GP:
- Select Transactions – Purchasing – PO Generator from the menu
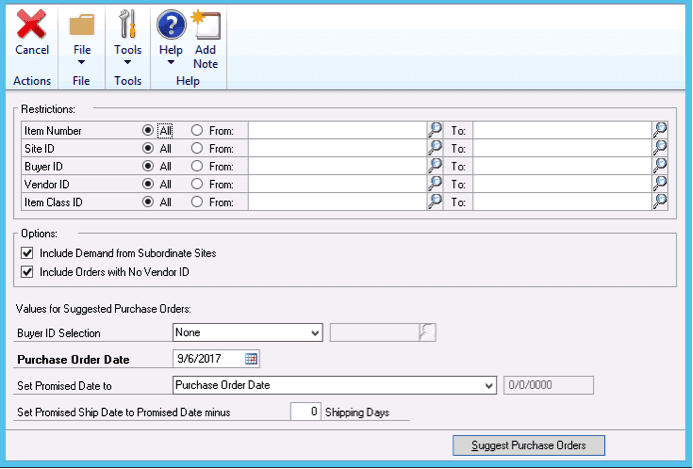
- Select Restrictions or a combination of restrictions for Purchase Order Generation, such as Item Number, Site ID, Buyer ID, Vendor ID, or Item Class ID. Utilize the From-To options to select your restriction.
- Include Demand from Subordinate Sites – suggestions for items to be purchased are collected from multiple sites for this item.
- Include Order with No Vendor ID – suggestions for items to be purchased will be included for items without a default Vendor ID. The Vendor can be updated on the Suggest Purchase Order screen.
- Select Buyer ID Selection for Purchase Order suggestions to use on each PO created
- None – No Buyer ID will be on PO
- Specified Buyer ID – Fixed ID entered
- Item Site Buyer ID – Uses the Buyer ID from the Item Site combination on the Item Resource Planning screen
- Purchase Order Date – Will be used for the date of each PO. This value defaults to the current date.
- Set Promise Date to – Sets the promise date for the PO items for each PO created
- Purchase Order Date – Sets the Promise Date to the same as the PO Date
- Purchase Order Date + Planning Lead Time – Sets the Promise Date to the PO Date plus the planning lead time
- Specified Date – Fixed Promise Date entered by the user
- Set Promised Ship Date to Promise Date minus – Sets the ship date with an additional shipping lead time entered by the user.
- Click the Suggest Purchase Order button
- Evaluate the list of Suggested POs for Vendors, quantities, and cost on the Suggested Purchase Order screen
- Mark or Un-Mark POs as desired by using the checkbox next to each PO. Marking a PO tells the system to generate this PO and Un-Marking a PO tells the system not to create this PO
- Evaluate Error Messages. A red X indicates that an error will prevent the suggested purchase order line item from being generated into a purchase order in Purchase Order Processing. A yellow exclamation point indicates the line contains a warning message, but can still be processed.
- Utilize the Drill downs to evaluate the items for:
- Item Number to view Item Card
- Vendor ID to view the Vendor Card
- Vendor Item Number to view the Item Vendor Card
- Site ID to view the Item Resource Planning options
- Ship To Address ID to view the Shipping Address for the PO
- Buyer ID to view the Buyer ID for the PO
- Click the Print button to Print a list of the suggested Purchase Orders
- Click the Process Button to create the Purchase Orders in Dynamics GP
We hope you have a better understanding of how to set up the Purchase Order Generator feature in Dynamics GP. If you have any questions, or if you’d like more information, be sure to contact us. We’re happy to help.