
Written by Robert Katz- Sr. GP Consultant
Organizations operating multiple legal entities often struggle with manual accounting, duplicate master data, and time-consuming reconciliations. Fortunately, Intercompany functionality in Dynamics 365 Business Central helps automate transactions between companies while maintaining proper accounting controls.
This guide explains what Intercompany is, why it matters, and how to configure it successfully in Business Central.
What Is Intercompany in Business Central?
Intercompany allows multiple companies within the same Business Central environment, or even across tenants, to transact with one another while maintaining separate general ledgers.
Common scenarios include:
- One company providing services to another
- Cross-company inventory sales
- Shared service departments such as IT, HR, or Finance
- Centralized purchasing and billing
- Management fee allocations
As a result, each company maintains its own financial records while Business Central helps keep transactions synchronized and balanced.
Benefits of Intercompany Processing
A Before setting up Intercompany, it is important to understand the core components involved:
- Intercompany Partner: Represents another company you transact with.
- Intercompany Chart of Accounts: Shared or mapped G/L accounts used for intercompany transactions.
- Intercompany Customer/Vendor: Trade relationships between companies.
- Inbox/Outbox Transactions: Used to exchange transactions between companies.
- Document Approval and Acceptance: Controls how transactions are received and posted.
Each legal entity is configured independently but is able to communicate with its Intercompany partners through these components.
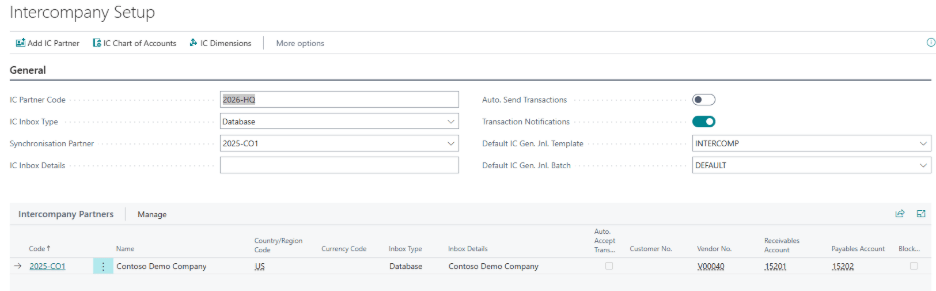
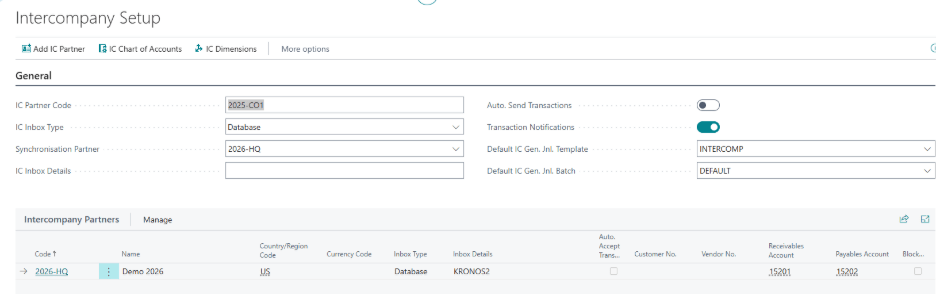
Step 1: Configure Intercompany Setup
In each company:
- Search for Intercompany Setup.
- Specify:
- Intercompany G/L Account
- Default posting behavior
- Inbox transaction handling
This establishes the foundation for Intercompany processing.
Note: Intercompany Partners must be set up before you can complete the Intercompany Setup.
Intercompany Setup – Demo 2026 (HQ)
Intercompany Setup – Demo 2025 (CO1)

Step 2: Create Intercompany Partners
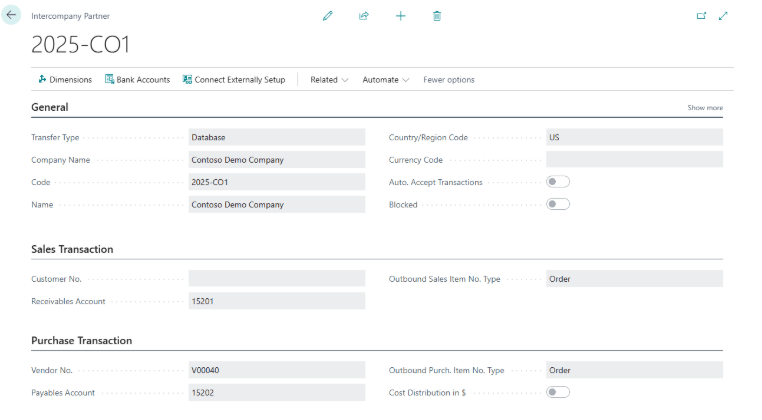
Next, open Intercompany Partners and create a partner for each related company.
Define the following:
- Partner Code
- Partner Type (Company, Customer, or Vendor)
- Inbox handling rules
✅ Tip: Partner codes should match company names or commonly used abbreviations for clarity.
Example Company Structure
In this example, there are two companies:
- Demo 2026 (Parent/HQ)
- Demo 2025 (CO1 Subsidiary)
Intercompany Partner – Demo 2026 (HQ)
Intercompany Partner – Demo 2025 (CO1)
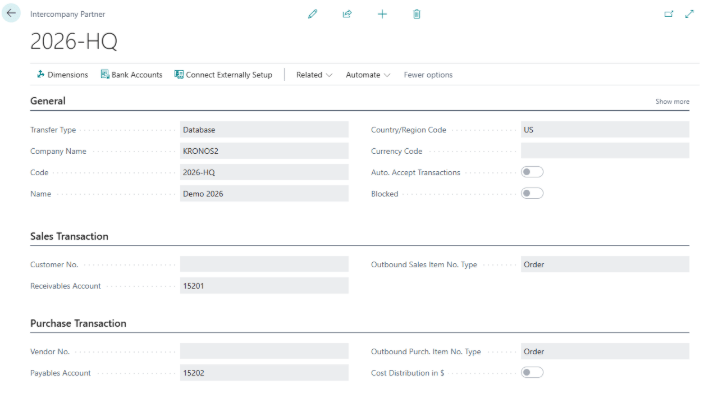
A few important configuration options include:
- If you activate Auto Accept Transactions, Intercompany activity automatically moves between companies, eliminating manual Inbox and Outbox processing.
- Assign the Due To and Due From accounts under the Sales and Purchasing Transaction account assignments.
- Customer and Vendor numbers determine the default records used when creating Intercompany sales and purchasing transactions.
Step 3: Configure the Intercompany Chart of Accounts
Business Central provides two approaches:
- Use a shared Chart of Accounts (recommended)
- Map accounts between companies
The Intercompany Chart of Accounts defines which G/L accounts can be used for Intercompany postings. Consequently, it helps prevent invalid postings and encourages consistency across legal entities.
Setup in Demo 2026 (HQ)
- Create the Intercompany accounts in the Main or HQ company first.
- Use Copy from Chart of Accounts to copy the Chart of Accounts from the HQ company. This creates the master Intercompany account list.
- No Mapping is required in MAIN or HQ Company.
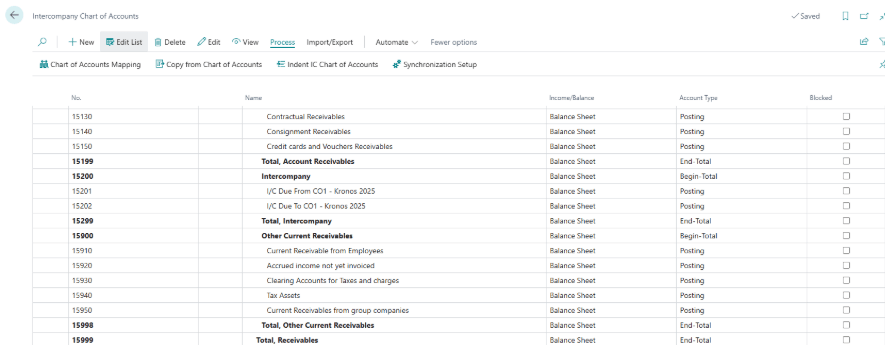
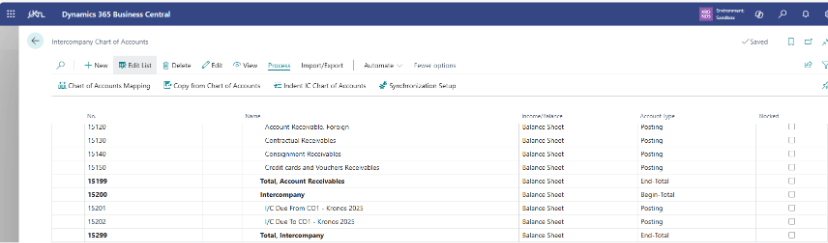
When using the same Chart of Accounts in both companies, the Intercompany accounts from the HQ company will already be available.
- Open the Intercompany Chart of Accounts.
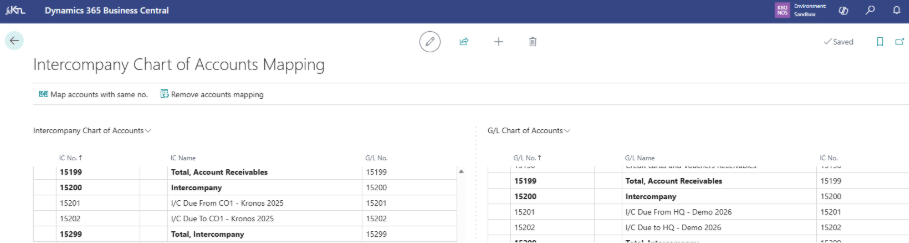
- Click the Chart of Accounts Mapping Option.
When prompted, select Map Accounts with Same Number because both companies use the same Chart of Accounts.
If your companies have different account structures, manual mapping will be required.
If the COA is different you will need to manually map the accounts

Step 4: Set Up Intercompany Customers and Vendors
Intercompany transactions typically flow through:
- Intercompany Customers in the selling company
- Intercompany Vendors in the buying company
These records must be linked to the appropriate Intercompany Partner.
As a result, Business Central can automatically create and exchange documents between companies.
This setup is only required if you plan to use Sales Orders and Purchase Orders between companies.
You will identify the Customer or Vendor Intercompany code associated with the respective Customers and Vendors.


Step 5: Configure Intercompany Posting Setup
Finally, review the posting configurations.
Within General Posting Setup and Intercompany Posting Setup:
- Map posting groups
- Define balancing accounts
- Review VAT and tax configurations
✅ Best Practice: Test VAT and tax scenarios early in the implementation process. Many Intercompany issues originate from inconsistent tax setups.
How Intercompany Transactions Work
Consider the following example:
- Company A creates a Sales Invoice for an Intercompany Customer.
- The invoice is posted.
- Company B receives a Purchase Invoice in its Inbox.
- Company B reviews and posts the document.
- Both companies maintain balanced accounting records.
Therefore, finance teams can reduce manual journal entries and eliminate many spreadsheet-based reconciliations.
Intercompany Dimensions and Allocations
Intercompany transactions can also support dimensions such as:
- Departments
- Cost Centers
- Projects
Dimensions may either:
- Pass through from the originating company, or
- Be overridden in the receiving company.
This flexibility is especially useful for shared service allocations, project reporting, and management reporting requirements.
Common Pitfalls and How to Avoid Them
Missing G/L Account Mapping
If an account is not designated for Intercompany use, transactions may fail.
✅ Solution: Maintain a clean and updated Intercompany Chart of Accounts.
Inconsistent Posting Groups
Different VAT or posting group configurations can cause rejected transactions.
✅ Solution: Align posting setups across all companies.
Manual Posting Overrides
Users may bypass Intercompany processes and create manual journals.
✅ Solution: Restrict permissions and establish clear accounting procedures.
Poor Naming Conventions
Inconsistent naming can make transactions difficult to identify and audit.
✅ Solution: Standardize company and partner naming conventions across the organization.
Intercompany vs. Consolidation
Although these processes are often confused, they serve different purposes.
- Intercompany: Manages operational transactions between companies.
- Consolidation: Combines financial results for group-level reporting.
As a result, effective Intercompany processing makes consolidation more accurate and significantly easier to manage.
Final Thoughts
Intercompany functionality in Dynamics 365 Business Central is more than a technical feature. When configured correctly, it helps organizations automate transactions, strengthen accounting controls, and reduce manual effort.
Additionally, Intercompany processing can help finance teams spend less time on reconciliation and more time analyzing business performance. If your organization operates multiple companies and still relies on manual journals or spreadsheets, Intercompany functionality may be one of the most valuable capabilities to implement in Business Central.