Written By Jerome Stewart
Customizing Dynamics 365 warning banners using JavaScript is a practical way to improve user experience and prevent errors. Warning banners alert users to critical information without disrupting their workflow, making them more effective than pop-ups. In this guide, we’ll walk through how to implement warning banners with JavaScript and provide best practices for optimal use.
Why Use Warning Banners in Dynamics 365?
Warning banners are visual cues that highlight important details, such as:
- Unsaved changes
- Missing required fields
- Compliance alerts
Unlike dialog boxes, banners are less intrusive and allow users to continue working while staying informed about potential issues.
Using JavaScript and the Xrm API
Dynamics 365 provides a client-side API called Xrm that allows developers to interact with forms and controls. The setFormNotification method is used to display warning banners at the top of a form. This method is simple, effective, and widely used in real-world scenarios.
Step-by-Step Implementation
1. Identify the Condition for the Warning
Determine when the banner should appear. For example, display the banner if a required field is empty or if a record status meets a specific condition.
2. Add JavaScript to the Form
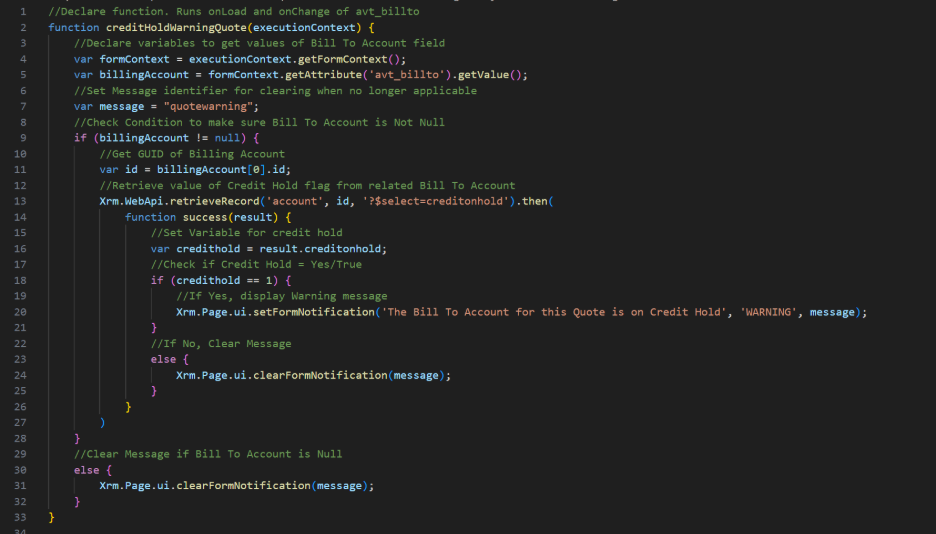
Create a JavaScript web resource and write a function to check the condition and set the notification:
function showWarningBanner(executionContext) {
    var formContext = executionContext.getFormContext();
    var myField = formContext.getAttribute("new_myfield").getValue();    if (!myField) {
        formContext.ui.setFormNotification(
            "Warning: 'My Field' should not be empty.",
            "WARNING",
            "myfield_warning"
        );
    } else {
        // Remove the notification if the condition is no longer met
        formContext.ui.clearFormNotification("myfield_warning");
    }
}
3. Register the JavaScript Function
In the form editor, add the web resource and register the showWarningBanner function on the appropriate events, such as OnLoad and OnChange for the target field. This ensures the banner updates dynamically.
4. Test Your Implementation
Publish the customizations and test the banner under different scenarios to ensure it behaves as expected.
Best Practices for Dynamics 365 Warning Banners
- Use Clear Messaging: Make the warning text concise and actionable.
- Assign Unique Notification IDs: This allows for easy removal or updates later.
- Limit the Number of Banners: Too many banners can overwhelm users and reduce effectiveness.
- Consider Accessibility: Ensure banners are readable and compatible with screen readers.
Conclusion
Setting warning banners in Dynamics 365 using JavaScript is a straightforward way to guide users and improve data quality. By leveraging the setFormNotification API and following best practices, developers can enhance the user experience, reduce errors, and boost adoption of Dynamics 365 forms. Start implementing warning banners today to see measurable improvements in your organization’s workflow.
Best Practices
- Use Clear Messaging: Make sure the warning text is concise and actionable.
- Assign Unique Notification IDs: This allows you to easily remove or update specific banners later.
- Limit the Number of Banners: Too many warnings can overwhelm users and reduce their effectiveness.
- Consider Accessibility: Ensure your banners are readable and compatible with screen readers.
Setting warning banners in Dynamics 365 using JavaScript is a simple yet powerful way to guide users and prevent errors. By leveraging the setFormNotification API and following best practices, you can enhance the user experience and improve data quality. Start implementing banners today and see the difference in your Dynamics 365 environment!